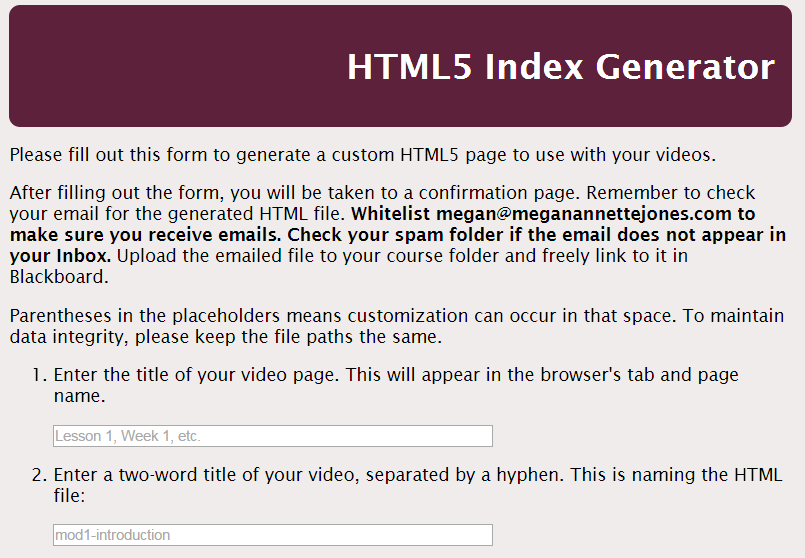
After spending some time with the interactive HTML5 player I built, I was interested in implementation. After all, what’s the use of obtaining new technologies and not using them? I remember from graduate school how most technology implementations fail because leadership doesn’t have a good plan for integrating those technologies into workflow.
At EKU, currently the Instructional Designers use different types of media players. Some are hard-coded HTML and CSS, others are generated by Articulate Storyline 2 or Hype. Having a universal video player with interactive transcripts just seemed to fit for this environment. I believe it provides a consistent, professional appearance. Accessibility was also a concern for us, too.
Along with the diversity of programs used by IDs, there are different skill levels when it comes to coding in general. Some coworkers are good coders, others find code and replace components. This environment reminded me of teaching a classroom full of students at various levels of knowledge; I thought of a solution that involved more than just teaching them how to code and replace items in an HTML document. Honestly, with the course load a lot of us have, asking someone to learn basic programming is a bit much.
I created a form in PHP for the purpose of generating HTML documents to use with my HTML5 media player assets. I organized the resources for the player in a separate folder on the server, and created some course folders with img, vid, and cap folders within. This should be pretty straightforward — all the IDs need to do is put the content in the appropriate folder, and then copy and paste hyperlinks to that content in the PHP form I created.
I couldn’t get permissions to work on our EKU servers, so I am hosting this generator on my personal site. I have set up a script to clean out the generated files daily.

Here are the steps for using the form:
- Copy course video assets in to appropriate folders; images go in the img folder, video goes in the vid folder (if you’re using a local video), and caption files go in the cap folder (I would also include the transcript in this folder as well). Keep FileZilla open for now.
- Navigate to the generator;
- Enter the following information in the form:
- Title of the video page, which also shows in the browser’s title bar or tab;
- Enter a two-word title of your video, separated by a hyphen. This is naming the HTML file. Hyphens make hyperlinks less messy.
- Enter the URL for the poster image at the beginning of the video. A dummy version of the poster file is included in the img folder. Use the dimensions of that file to create your own. Find the file in FileZilla and right click on it. Select Copy URL.
- Go back to the form and paste the URL.
- The only problem with this method is that it will include some FTP jargon, such as ftp://[email protected]/courses.x.eku.edu/. All you need to do is delete the ftp://username@server/ and type http:// at the beginning. The final URL link should look like this: http://courses.x.eku.edu/course/img/poster.png.
- You will need to repeat this process for each server file URL in this form. For some reason, FileZilla includes the FTP protocol and login when you copy a link this way. Alternatively, you could type in the URL if you remember it.
- Next, you will select the type of video: Local server file or YouTube;
- For step 5, enter either the local server file URL or the YouTube URL — not both;
- Always include a caption file for interactive transcripts;
- Always include a transcript file for student download;
- Finally, enter your email address and my server will email the generated HTML file to you. (Be patient — it takes a little while for my server to do this.) Simply download and plug this file in to your course folder, and you are ready to go!